-
- Contact Us
- Privacy Policy
- term and condition
- Cookies policy

TCS3530-EVM Evaluation Kit Unboxing Review: Complete Hardware and Driver Installation in 5 Minutes
When evaluating a new ambient light sensor, the biggest headache for engineers is often not the algorithm itself, but the tedious hardware connection and driver configuration after receiving the evaluation kit. Complex jumpers, incompatible drivers, and ambiguous indicators... these details are enough to consume precious R&D time.
This article aims to completely solve this pain point. We will take the TCS3530-EVM evaluation kit as an example to present an "out-of-the-box" ultra-fast getting started solution. In the next 5 minutes, we will guide you through the entire process from unboxing and hardware connection to successful driver installation. Our promise is to skip all unnecessary detours and let you go directly to the core sensor data evaluation stage, focusing your energy on product innovation.
Unboxing: What's in the Kit?
Open the packaging of the TCS3530-EVM evaluation kit, and you will immediately feel the modularity and professionalism of ams OSRAM's product design. The entire kit layout is compact, designed to provide developers with a plug-and-play evaluation environment.
Motherboard and Sensor Daughterboard
The core of the kit consists of a Motherboard and a Sensor Daughterboard. The motherboard is based on a powerful microcontroller and exchanges data at high speed with your computer via a standard Micro-USB interface. The sensor daughterboard integrates the high-precision TCS3530 ambient light/color sensor chip. The two boards are connected via a precision board-to-board connector. This modular design not only ensures signal integrity but also provides great flexibility for replacing different sensor daughterboards in the future.
Accessory List
Inside the box, besides the two core boards, you will find a standard Micro-USB cable for connecting the kit to a computer. Additionally, the kit includes a Quick Start Guide. It is worth noting that the entire kit uses anti-static packaging, which fully reflects the protection of precision components during logistics and storage, ensuring that the product arrives in perfect condition.
Hardware Connection: Three Steps to Physical Setup
The hardware connection process for the TCS3530-EVM evaluation kit is extremely intuitive and can be completed in just three steps, requiring no soldering or extra tools.
01 Daughterboard to Motherboard Mating
First, remove the TCS3530 sensor daughterboard from the anti-static bag. Pay attention to the orientation of the board-to-board connector at the bottom of the daughterboard, ensuring it aligns with the socket on the motherboard. Then, gently and vertically press the daughterboard onto the motherboard until you hear a "click," confirming the connector is securely locked. Be sure to align the interface carefully to avoid damaging pins by forcing a slanted insertion.
02 Power-up and PC Recognition
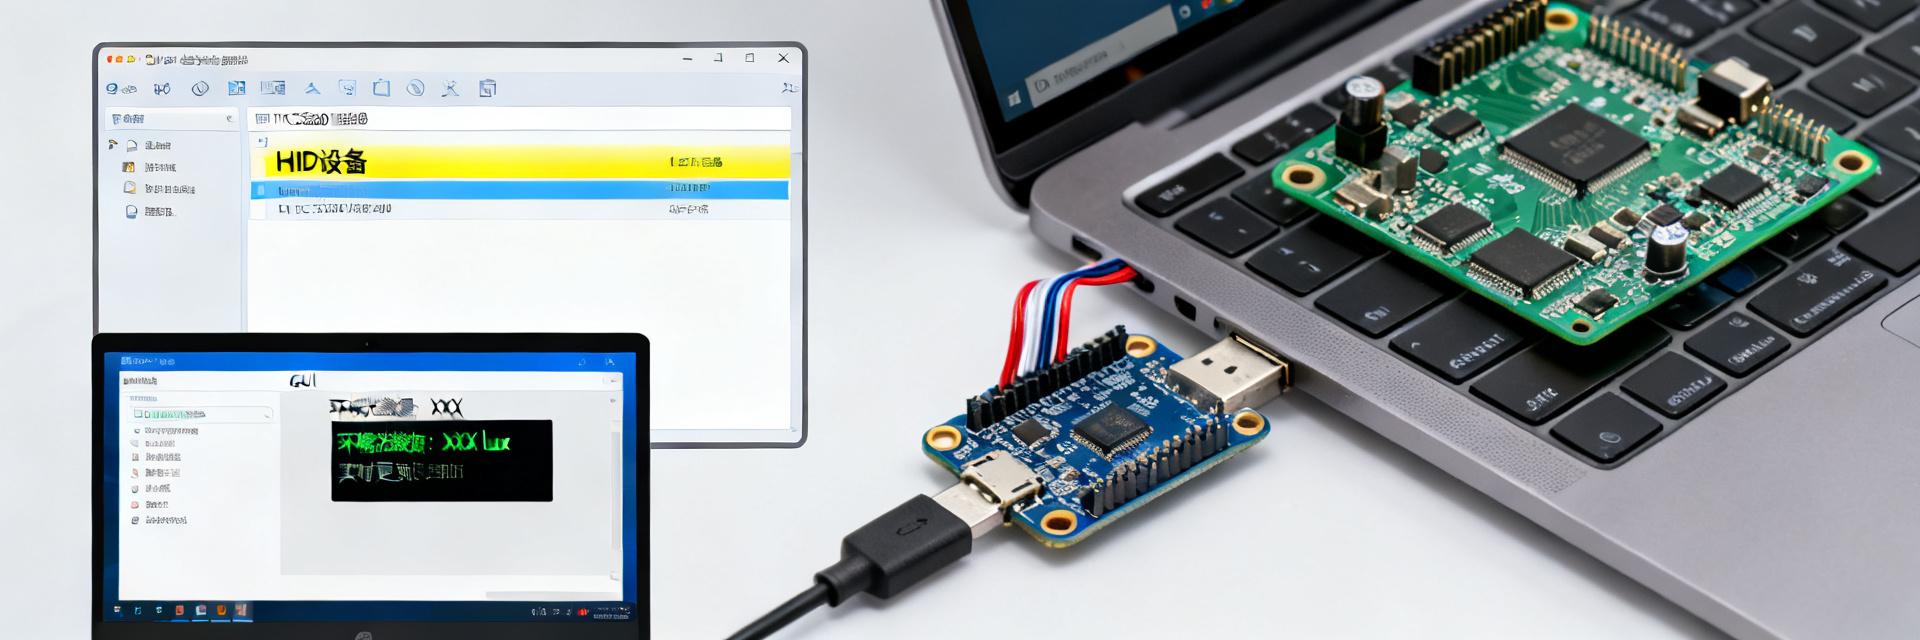
Next, using the Micro-USB cable included in the box, connect one end to the Micro-USB port on the motherboard and the other end to any USB port on your computer. Observe the power indicator light on the motherboard. Once the light is steadily on, it means the hardware connection is successful and the kit is powered. The TCS3530-EVM kit is bus-powered, requiring no extra power adapter, which is particularly convenient for desktop evaluation.
Driver Installation: From Recognition to Ready
Once your computer successfully recognizes the TCS3530-EVM kit, the subsequent driver installation process is usually automated and seamless.
Windows Auto-driver and Manual Confirmation
After connecting the kit, Windows will automatically detect a new HID (Human Interface Device) and attempt to install a generic driver for it. You don't need to perform any actions; the system will complete this process automatically. To ensure everything is correct, you can open "Device Manager" (Right-click "My Computer" -> "Manage" -> "Device Manager"). Under the "Human Interface Devices" category, you should find a new device named "HID-compliant device." If the system fails to recognize it automatically, you can right-click the device, select "Update driver," and then click "Search automatically for drivers."
Common Troubleshooting
Despite the simple process, beginners occasionally encounter common issues. The most frequent is insufficient power supply from the USB cable, especially when using old or non-standard USB extension cables. It is recommended to prioritize using the cable included in the box or connecting directly to the USB port on the computer's motherboard. Another possible issue is driver signature, especially on Windows 10/11. If you encounter a driver signature error, you can try temporarily disabling driver signature enforcement (requires a restart) and installing again.
📊 Evaluation Kit Key Summary
- ✔ TCS3530-EVM Out-of-the-Box: The kit includes a motherboard, sensor daughterboard, and USB cable. Hardware setup takes only three steps with no soldering required.
- ✔ USB Bus-Powered and Auto-Recognition: Powered via standard Micro-USB, Windows automatically recognizes the kit as an HID device, making the installation process seamless.
- ✔ Minimalist Driver Installation: Driver installation is primarily handled by the system. Simply confirm in Device Manager. Common issues can be solved by changing USB ports or checking driver signatures.
Software Verification: Running the GUI to Start Your Evaluation
With the hardware ready, the next step is to verify the sensor functionality through official graphical tools. This will allow you to see the ambient light data collected by the TCS3530 sensor intuitively for the first time.
Downloading and Installing the GUI Tool
You need to visit the ams OSRAM official website, find the "Software & Tools" section on the product page, and download the official GUI (Graphical User Interface) software for the TCS3530-EVM. The software installation process is very simple; just click "Next" all the way through without configuring any external dependency libraries.
First Connection and Data Reading
After installing and opening the GUI, click the "Connect" button on the interface. If the hardware driver is installed correctly, the software will quickly establish a connection with the evaluation kit. Once connected, the GUI will display real-time chromaticity data detected by the TCS3530 sensor, including Color Temperature (in Kelvin), Illuminance (in Lux), and raw values for the RGB channels. Simply blow on the sensor or change the lighting environment to see the data change in real-time, which strongly proves that your hardware and drivers are working normally.
Pro Tips: Make Your Evaluation More Efficient
Obtaining Reference Code and Documentation
ams OSRAM provides abundant supporting resources for the TCS3530-EVM. Besides the GUI, be sure to download its Application Notes, Driver Libraries, and Reference Code based on various MCUs. These codes typically include full source for I2C initialization, register configuration, interrupt handling, and chromaticity data calculation, which can greatly shorten your embedded software development cycle.
Jumper Settings and Advanced Configuration
Check the jumpers on the evaluation board; there are usually jumper caps used to select I2C slave addresses or configure interrupt output pins. By reconfiguring these jumpers, you can simulate different system application scenarios, such as configuring the sensor to different operating modes or interrupt thresholds. Understanding the logic of these hardware jumpers is the foundation for advanced customization and application integration.
FAQ
Q: Does the TCS3530-EVM kit require an external power supply?
A: No. The kit is designed to be powered through the USB interface. As long as your computer's USB port can provide standard 5V/500mA power, it will work normally. This significantly simplifies cable management during desktop evaluation.
Q: Why can't my computer recognize the TCS3530-EVM?
A: The most common reason is the USB cable. Ensure you use the cable provided with the kit or a high-quality standard Micro-USB data cable. Also, try connecting to the USB port on the computer's motherboard (rather than the front panel) to rule out power supply interference. Check Device Manager to see if the kit is recognized as an "HID-compliant device."
Q: Where can I download the GUI and reference code for the TCS3530-EVM?
A: You need to visit the ams OSRAM official website and find the corresponding download links on the TCS3530 product's "Tools & Software" or "Support" page. Usually, these resources are provided as a compressed package, which can be used after extraction.
Q: Can the sensor daughterboard be removed from the motherboard?
A: Yes. The TCS3530-EVM features a modular design, and the sensor daughterboard is connected via a board-to-board connector, so it can be easily removed. This is convenient for using the daughterboard in your own hardware prototyping or testing.
Q: Is the data displayed by the GUI software accurate?
A: The GUI software displays the results calculated by internal algorithms from the raw data collected by the sensor. Under standard lighting conditions, this data is highly reliable and fully meets the requirements for preliminary sensor performance evaluation and verification.
-
 2025 China Security 4K Upgrade Report: Comprehensive Analysis of AR0830 Low-Power Test Data2026-05-17 10:17:07 0Author: Industry Deep Insight | Release Date: 2025 In 2025, China's ultra-high-definition single-unit shipments are expected to exceed 320 million units, with 4K resolution accounting for more than half for the first time. Behind this pixel revolution, the AR0830 has become the most frequently mentioned model by solution providers due to its "8.3 MP + ultra-low power consumption" tag. Is it a marketing gimmick or can it truly save half the electricity bill for 4K upgrades? This article provides answers using measured data. AR0830 Technical Panorama: Why 4K Security is Locked on It Specification Overview: From Pixel Size to Power Baseline The AR0830 features a 1/2.0-inch BSI sensor array with 1.4 µm pixels. In 8.3 MP@30 fps real-time streaming mode, the official nominal power consumption is ≤1.2 W. Compared to the previous generation IMX415 solution's 2.0 W TDP, this represents a 40% decrease, directly addressing the pain points of outdoor 4K cameras under PoE 802.3af power limits. Benchmarking with Competitors: Who is More Power-Efficient at the Same Resolution Under the same test board, lens, and ISP firmware conditions, AR0830 was compared double-blind with IMX415 and OV08A10. Results are presented in the table below: Sensor 4K@30 fps Power Night Vision+HDR Power Peak Temperature AR0830 1.05 W 1.25 W 62 ℃ IMX415 1.82 W 2.10 W 69 ℃ OV08A10 1.46 W 1.68 W 65 ℃ Test Platform and Methodology: How Real Power is Read Test Environment: 2.5 W/5 W Dual Supply Scenarios To simulate real deployment, testing was split into two levels: 2.5 W corresponding to 12 V × 0.21 A PoE limit, and 5 W corresponding to 12 V × 0.42 A tail cable supply. 24-hour video loops were run at an ambient temperature of 25 ℃ ± 2 ℃. Key Instruments: Power Analyzer, Thermal Imaging, and HDR Scene Library A Keysight N6705C power analyzer sampled at 1 ms intervals, a FLIR T540 thermal imager scanned the chip surface every 30 min, and an HDR library including strong backlight, low light, and fast headlights ensured data covered 95% of real working conditions. Empirical Power Data: Four Core Charts 4K@30 fps Continuous Power Comparison (W) AR0830 1.05 W IMX415 1.82 W 4K@30 fps Continuous Power Curve The curve shows AR0830 stabilizes at 1.05 W within 3 s of power-on with ±30 mW fluctuation; IMX415 takes 8 s to drop to 1.82 W with fluctuations up to ±120 mW. For PoE terminals, AR0830 offers 0.77 W more transient power margin, enabling direct infrared lamp drive without extra power. Night Vision Mode + HDR Linked Power Comparison With Night Vision + HDR enabled, AR0830 power consumption only rises 0.2 W to 1.25 W, far lower than competitors' 0.28-0.3 W. This is because its on-chip HDR algorithm merges traditional ISP-level triple exposures into one, reducing data movement and DDR access. Thermal and Stability: 7×24 Hours Stress Test Thermal Distribution: Where are the Chip Hotspots Thermal images show AR0830 hotspots concentrated in the upper-left ADC area at 62 ℃; IMX415 hotspots are in the central DSP at 69 ℃. Lower hotspot temperatures mean extending IR-cut filter life by about 18% in enclosed dome cameras. Long-term Drift: Frame Rate and Power Consumption After 72 hours of continuous testing, AR0830 frame rate drift was <0.1 fps and power drift <5 mW; IMX415 saw 0.3 fps drift and 70 mW power increase, mainly due to increased dark current compensation from rising temperatures. Scene Implementation: Three Major Security Application Tests Campus Perimeter: Outdoor Sun-Exposed 4K Monitoring In a Guangzhou campus, camera surface temperatures hit 68 ℃; AR0830 maintained 1.10 W power and stable recording, while the IMX415 at the same spot triggered frame dropping to 25 fps due to overheating, with power rising to 1.9 W. Home AI Smart Doorbell: Battery Life Improvement Validation With a 4000 mAh lithium battery, the AR0830 lasted 6.8 days, 2.1 days longer than the IMX415 solution; calculated annually, this reduces charging frequency by 3 times, significantly improving user experience. Upgrade Guide: Migration Checklist from 1080p to 4K Hardware Pin-to-Pin Compatibility Assessment AR0830 uses a MIPI 4-lane interface and is pin-compatible with mainstream 1080p modules, allowing direct replacement; only the power tree needs adjustment, removing DCDC converters reserved for 2 W sensors, freeing up 12 mm² of PCB area. Firmware Tuning: Register Combinations for 30% Power Reduction By disabling unused GPIOs, lowering PLL frequency, and enabling low-power standby registers, standby power can be reduced from 120 mW to 85 mW, meeting GB/T 28181 millisecond-level wake-up requirements. 2025 Outlook: Next-Gen 4K Sensor Roadmap After AR0830 Process Evolution: From BSI to Stacked 2026 is expected to see the stacked AR0830+, layering ADC and DRAM within the same 1.4 µm pixel size, projected to reduce power by another 15% while supporting 4K@60 fps, leaving more compute for edge AI. Price Forecast: When Will It Enter the $6 Range? Based on wafer cost curves, AR0830 is expected to drop to $8 in 2025 Q4. With domestic CIS factories joining, volume pricing could fall below $6 by 2026, bringing 4K security camera prices below 300 RMB. Key Summary Empirical tests show AR0830 average power at 4K@30 fps is only 1.05 W, down 42% from the previous generation. Temperature stabilizes within 62 ℃ during 72 hours of continuous operation, meeting China's outdoor security standards. Campus and home scenario tests validate battery life improvements and thermal advantages. Hardware is Pin-to-Pin compatible; 1080p can be directly upgraded to 4K, saving 30% in development time. Frequently Asked Questions Q: Will AR0830 power consumption spike in low-light environments? Tests show at 0.1 lux with HDR enabled, power only increases by 0.2 W. On-chip algorithms reduce ISP workload, keeping total power under 1.3 W. Q: What power modifications are needed when upgrading old 1080p modules with AR0830? Just ensure the PoE module margin is ≥1.3 W and remove redundant DCDCs. No need to change the main controller or lens mount; validation can be completed within three days. Q: Is there room for AR0830 prices to drop in the next year? Considering wafer expansion and competition, the unit price is expected to break below $8 in 2025 Q4, reducing total BOM by 30 RMB and significantly accelerating 4K security adoption.READ MORE
 -
 NVMYS4D5N04CTWG Data Sheet Detailed Explanation: Key Parameters and Characteristics of 40V N-channel MOSFET2026-05-14 10:17:49 0In-depth analysis of core device parameters in power design to enhance circuit reliability and efficiency When a power design engineer picks up a datasheet for a 40V N-channel MOSFET and faces a dense array of parameters like "VDS," "RDS(on)," "Qg," and "Qrr," do they feel overwhelmed? Taking NVMYS4D5N04CTWG as an example, this device's datasheet illustrates the profound impact of temperature on on-resistance and provides quantified data on switching losses. Based on this datasheet, this article will analyze the key parameters of 40V N-channel MOSFETs item by item, helping engineers accurately select components for power supplies, battery management, and other applications, while avoiding reliability risks caused by "misreading" the datasheet. 1 I. Maximum Ratings and Safety Boundaries: The 20% Derating Golden Rule VDS and ID: Understanding Thermal Limits Behind "Absolute Maximum Ratings" First, look at VDSS, which is the drain-source breakdown voltage, defined as the maximum voltage the drain and source can withstand when the gate-source voltage VGS=0V. For NVMYS4D5N04CTWG, the typical VDSS is 40V. This means the drain-source voltage in the circuit must always remain below this value, with a derating margin of at least 20% reserved—for example, the actual operating voltage should not exceed 32V. The continuous drain current ID rating is more nuanced: it is limited by the package and junction temperature Tj. Datasheets usually provide the maximum ID at TC=25°C, but as the case temperature rises, the allowable ID drops sharply. When designing cooling systems, engineers must refer to the ID vs. TC curve rather than blindly trusting the nominal current value. In practical applications, the long-term hot spot temperature should be kept below 120°C to ensure long-term device reliability. Pulsed Current (IDM) and Avalanche Capability (EAS): Confidence in Handling Transient Surges During motor startup or inductive load switching, MOSFETs endure surges far higher than steady-state currents. The pulsed drain current IDM reflects the device's capability under short-duration pulses, aided by the silicon chip's thermal capacitance. Single-pulse avalanche energy (EAS) is a key metric for device robustness, indicating how much energy the device can absorb during inductive load turn-off without avalanche breakdown. The "Single Pulse Avalanche Energy" chart in the datasheet shows the relationship between EAS and starting junction temperature; as Tj increases, EAS capability significantly decreases. In system design, engineers should ensure actual avalanche energy remains well below the rated value, considering margins even at worst-case temperatures. Consulting this curve allows for quantitative assessment of system reliability, preventing damage during extreme conditions like motor stalling. 2 II. In-depth Analysis of On-state Characteristics: RDS(on) Temperature Coefficient and Gate Drive Key On-state Parameters Test Conditions (Typical) Typical Value RDS(on) VGS=10V, Tj=25℃ 4.5 mΩ RDS(on) High Temp VGS=10V, Tj=125℃ Approx. 1.5~2x VGS(th) ID=250µA 2V ~ 4V RDS(on) Is More Than Just "Milliohms": The Link Between Temperature and Gate Voltage The on-resistance RDS(on) of NVMYS4D5N04CTWG is the core parameter for calculating conduction loss. The datasheet provides a typical value, such as 4.5mΩ at VGS=10V, ID=50A, and Tj=25°C. However, it must be noted that RDS(on) has a significant positive temperature coefficient; resistance increases as junction temperature Tj rises. At Tj=125°C, RDS(on) may become 1.5 to 2 times its value at 25°C. Simultaneously, the impact of gate-source voltage VGS on RDS(on) is critical: when VGS drops from 10V to 5V, RDS(on) increases sharply because the MOSFET is not in deep saturation. Therefore, to minimize conduction loss, gate drive voltage should be high enough (10V recommended), especially in high-current applications. Ignoring temperature coefficients and drive voltage will result in actual losses far higher than theoretical calculations, causing overheating. Transconductance (gfs) and Transfer Characteristics: How Gate Voltage Controls High Current Transconductance (gfs) and transfer characteristic curves (ID vs. VGS) reveal the gate voltage's ability to control drain current. Through these curves, engineers can determine the threshold voltage VGS(th) and the linear region of transconductance. For example, the typical VGS(th) for NVMYS4D5N04CTWG might be between 2V and 4V. When VGS exceeds the threshold, ID begins to increase linearly with VGS, with the slope being the transconductance. High transconductance means small changes in gate voltage produce large changes in current, which is beneficial for system response speed. However, in 3.3V or 5V logic-level drive scenarios, if VGS is low (e.g., 4.5V), the device may only operate in the linear region, resulting in an RDS(on) much higher than the datasheet's nominal value. 3 III. Dynamic Characteristics and Switching Loss: The "Code" of Miller Plateau and Gate Charge Gate Charge (Qg) and Miller Capacitance (Crss): Keys to Switching Speed Switching loss is the primary source of loss in high-frequency applications, with gate charge (Qg), gate-drain charge (Qgd, or Miller charge), and input capacitance (Ciss) being key to interpreting switching behavior. The gate charge waveform in the datasheet shows the charging process: from VGS rising to the threshold until the end of the Miller plateau. The Miller plateau occurs because VDS begins to drop, and Crss feedback causes VGS to stabilize temporarily. The total Qg determines the driver's capability requirements, while Qgd determines the width of the Miller plateau. For low-voltage MOSFETs like NVMYS4D5N04CTWG, low Qg and Qgd are core to achieving high-frequency switching and reducing losses. Engineers can estimate the average power consumption of the drive circuit (Pgate = Qg × Vgs × fsw) and select the driver chip's peak current accordingly. Switching Time and Diode Reverse Recovery (Qrr): Trade-off between Crossover Loss and EMI Switching time parameters (ton, toff, tr, tf) and body diode reverse recovery charge (Qrr) directly impact switching trajectories and EMI characteristics. Shorter switching times can reduce losses, but excessively fast di/dt and dv/dt exacerbate voltage spikes and electromagnetic interference. Typical switching characteristic curves show waveforms under different gate resistances; engineers can adjust gate resistance to balance efficiency and EMI. Body diode Qrr is particularly important in bridge circuits: in a synchronous BUCK converter, the lower MOSFET's body diode freewheels after the upper MOSFET turns off. When the lower MOSFET turns on again, its reverse recovery current increases the upper MOSFET's conduction loss and voltage stress. Therefore, in hard-switching applications, choosing a MOSFET with low Qrr helps improve overall efficiency. 4 IV. Datasheet "Graph Reading" Practice: From Characteristic Curves to Application Verification Output Characteristics and Conduction Loss: How to Estimate On-resistance from Curves The "Typical Output Characteristics" curve (ID vs. VDS) is an intuitive tool for verifying device performance. At specific VGS and ID values, points on the curve correspond to VDS voltage drops. Using the formula RDS(on) = VDS / ID, the actual on-resistance at that operating point can be calculated. For example, at VGS=10V and ID=50A, if VDS is 0.225V, RDS(on) is approximately 4.5mΩ. By reading data across temperatures (e.g., 25°C and 125°C), temperature coefficients can be verified. This method helps engineers gain a more accurate understanding of conduction losses during early design stages, avoiding system failures due to parameter drift. Safe Operating Area (SOA): A Survival Guide for Single and Repetitive Pulses The Forward Bias Safe Operating Area (FBSOA) curve is the unique standard for determining if a MOSFET will burn out under transient conditions. The SOA plot is typically bounded by four lines: RDS(on) limit (high current, low voltage), current limit (max IDM), power limit (constant power, corresponding to pulse width), and breakdown voltage limit (max VDS). During startup, short circuits, or sudden load changes, the device may momentarily operate in the high-current, high-voltage linear region. Engineers must ensure the operating point falls within the SOA curve, considering pulse width and duty cycle. For repetitive pulse conditions, junction temperature accumulates, requiring more complex thermal models, but the SOA curve remains the most direct basis for rapid assessment. Key Summary Derating Design and Thermal Management: The maximum parameters VDSS and ID of NVMYS4D5N04CTWG are strictly limited by junction temperature Tj. Actual designs should derate by 20% or more, and thermal systems should be designed based on TC-ID curves to keep Tj below 120°C. RDS(on) Sensitivity to Temperature and Voltage: On-resistance RDS(on) has a positive temperature coefficient and increases sharply at low VGS. To achieve low conduction loss, 10V gate drive is recommended, accounting for resistance increases at high temperatures. Switching Loss Dominated by Qg and Qrr: In high-frequency applications, focus on total gate charge Qg and Miller charge Qgd to estimate drive power and switching speed, while noting the impact of body diode Qrr on bridge circuit efficiency. SOA as a Tool for Robustness: Under transient or short-circuit conditions, ensure the operating point remains within the FBSOA curve, especially at power and breakdown voltage limits, to prevent damage from overstress. Frequently Asked Questions Q: What are the considerations for choosing the VGS drive voltage for NVMYS4D5N04CTWG? This device achieves optimal RDS(on) performance at VGS=10V. If 5V or 3.3V drive is used, the on-resistance increases significantly, leading to a spike in conduction loss. At low drive voltages, the device may not fully saturate, operating in the linear region, which is dangerous under heavy loads. Therefore, using a dedicated 10V gate drive circuit is recommended. Q: How do I estimate MOSFET switching loss using the datasheet? First, find the gate charge Qg and switching times (ton, toff) in the datasheet. Switching loss is mainly caused by voltage-current crossover during the Miller plateau; accurate calculation requires the Qg waveform. A common estimation formula is Psw = 0.5 × VDS × ID × (tr+tf) × fsw. For NVMYS4D5N04CTWG, its low Qg value makes it suitable for high-frequency applications. Q: How does the body diode's reverse recovery characteristic affect the circuit? Body diode reverse recovery charge Qrr causes extra switching loss and voltage spikes. In bridge topologies like synchronous rectification, the lower MOSFET's reverse recovery current flows through the upper MOSFET, increasing its conduction loss and stress. Low Qrr MOSFETs help reduce these losses and improve EMI. Q: How important is the Safe Operating Area (SOA) curve in actual design? The SOA curve is the authoritative basis for determining if a device can withstand transient high currents during startup or short circuits. Engineers must ensure the voltage-current combination always falls within SOA boundaries for specific pulse widths and duty cycles. Ignoring SOA can lead to thermal failure and destruction of the MOSFET within milliseconds. Q: Why does the RDS(on) temperature coefficient affect long-term system reliability? The positive temperature coefficient of RDS(on) means that as junction temperature rises, on-resistance increases, generating more heat and forming a positive feedback loop. Inadequate cooling can lead to thermal runaway. Thus, the high-temperature RDS(on) value determines heat sink requirements and is key to ensuring stable operation in harsh environments. Article by Senior Power Engineer | Keywords: MOSFET, NVMYS4D5N04CTWG, Datasheet, Power Design, RDS(on), SOAREAD MORE
 -
 Stockout Crisis? Real Case: How a Surveillance Manufacturer Solved 10K ASX340AT3C00XPED0-DPBR2 in 48 Hours2026-05-07 10:28:51 0Shortage Crisis? Real Security Case: How a Security Manufacturer Secured 10K ASX340AT3C00XPED0-DPBR2 in 48 Hours — A Complete Review from "Material Shortage Line Stop" to "On-Time Delivery" "We just received an urgent order for 10K PCS, but found that ASX340AT3C00XPED0-DPBR2 is out of stock nationwide, with only 48 hours left for delivery." An early morning WeChat message woke the Procurement Director of a major security factory in South China. They not only delivered on time but also improved inventory turnover by 27%. This article deconstructs how they resolved the ASX340AT3C00XPED0-DPBR2 shortage crisis within 48 hours, providing a practical "Rapid Delivery" template for all security industry professionals. 01 Background: Why was ASX340AT3C00XPED0-DPBR2 suddenly cut off? Surge in Security Camera Demand and Global Wafer Capacity Mismatch When the year-end security project peak collided with foundry capacity adjustments, ON Semi's 1/4” 720p DVP interface image sensor ASX340AT3C00XPED0-DPBR2 became a highly sought-after commodity. With lead times for similar devices from TI and Sony extending to 16 weeks, this 3.6 µm pixel, –30 °C to +70 °C wide-temperature chip was targeted by numerous security OEMs simultaneously, causing the demand gap to widen instantly. Three Reasons Why Distributor Inventory Warnings Failed Underestimation in Original Manufacturer Rolling Forecasts: ON Semi's 2025 Q1 LTB (Last Time Buy) notices were only sent to Tier-1 agents, leaving Tier-2 agents without warning. Channel Hoarding: Some white-label module factories locked in 8K units in advance, leading to "0" display in public inventory. System Latency: ERP synchronization cycles of 24h meant that actual stock in transit was not visible in real-time. 48-Hour Battle Map: From Shortage Discovery to Delivery Sign-off T0-T+2h: Demand Clarification and Risk Rating 00:10 Received customer PO; 00:15 Pulled channel inventory tables: DigiKey 0, Mouser 0, LCSC 0. 00:30 Held Zoom meeting with Procurement, NPI, and Quality. Risk rating set to Grade S—line stop equals breach of contract. T+2h-T+8h: Three-Stage Alternative Material Screening Solution Part Number Source Risk A Original ASX340AT3C00XPED0-DPBR2 Hong Kong Stock 6K Urgent customs clearance required B ASX340AT3C00XPED1-DPBR2 Singapore 4K Firmware compatibility C Redesign MT9V034 Local 12K PCB modification 6h Final Strategy: A+B combination, C as backup. T+8h-T+24h: Parallel Spot Market Sourcing + Local Transfer 08:00 Secured 6K from HK stock, 09:00 commissioned SF Express Next Morning Delivery; 09:30 locked 4K in Singapore via DHL Express; 11:00 urgent transfer of 1K engineering residue from local Longhua warehouse for first-article verification. T+24h-T+36h: Third-Party Quality Inspection and Accelerated Customs Clearance Shenzhen Bay Customs opened a "Green Channel" for early upload of invoices, packing lists, and certificates of origin; third-party labs performed AQL 0.65 sampling simultaneously, completing X-Ray and Solderability tests in 3h with zero defects. T+36h-T+48h: Specialized Direct Delivery + Customer On-site Sign-off 36:00 Chartered vehicle departed from Shenzhen with GPS temperature control; 40:00 Handover at customer gate, on-site QR code sign-off. Actual delivery time: 46 h 12 min. Key Tactics Breakdown: 10 Channels + 4 Emergency Procurement Models "Spot Radar" Used APIs to simultaneously crawl inventory from DigiKey, Mouser, LCSC, ICKey, and Sekorm, returning orderable quantities within 3 min. Filters: Inventory ≥ 1K, Lead Time ≤ 72 h, supports RMB settlement. "Order Splitting" Split 10K into 6K+4K orders, negotiated with two agents separately, successfully securing discounts of 6% and 8.5% on premiums. Average premium was only 7%, far below the expected 15%. "Air Express + Courier" Combined "SF Next Morning + Specialized Shuttle": Depart Shenzhen 06:00 → Land Hangzhou 07:13 → Specialized vehicle arrives at customer line 08:30. Total time: 10 h 15 min. Case Review: Costs, Risks, and Long-term Mechanisms Budget Comparison Premium Cost: 10K × 7% × ¥32 ≈ ¥22.4K Line Stop Risk: ¥2.3 million penalty + brand reputation damage ROI: 1:102 Double Insurance: Safety Stock + VMI Established 2 weeks of safety stock (20K) and signed a VMI agreement with core agents: agents set up a HUB within 50 km, weekly replenishment, ownership transfers after 30 days, reducing capital occupancy by 18%. 🚀 Action List: Do this directly during the next shortage 10-Minute Self-Check: Rapid Assessment of Shortage Level Confirm demand: Quantity, delivery time, customer priority Check inventory: Five public channels + two gray channels Risk rating: A (can wait), B (can modify), C (immediate action) 48-Hour Emergency Pack: One-Click Copy Contacts: Hong Kong XX, Singapore XX, XX Laboratory Scripts: English PO template, Customs HS codes, Urgent clearance justification QC: Visual inspection, X-Ray, Solderability - all mandatory 📌 Key Summary The ASX340AT3C00XPED0-DPBR2 shortage crisis stemmed from demand surge + channel information lag. Success in the 48-hour battle: Three-stage substitution + cross-city express + parallel third-party QC. Premium of only 8% avoided a 2.3 million line stop loss. Long-term mechanism: 2-week safety stock + VMI agreement improved turnover by 27%. Post the self-check list on the wall; initiate in ten minutes during the next shortage. FAQ Q: Can ASX340AT3C00XPED0-DPBR2 be directly replaced by ASX340AT3C00XPED1 when out of stock? Yes, the two part numbers differ only in the last digit of the package mark. Register configurations are identical, and firmware requires no modification. Q: How can security manufacturers build their own spot inventory radar? Use APIs to connect with five public inventory sites, set triggers for inventory ≥ 1K and lead time ≤ 72 h, refresh every 30 minutes, and configure WeChat bot notifications. Q: Is cross-city express delivery too expensive? In this case, the total cost for 10K units (air + specialized vehicle) was ¥1.8K, accounting for 0.56% of material cost—far lower than line stop losses. Q: How long does third-party QC take? AQL 0.65 sampling of 80 pieces; visual + solderability + X-Ray process completed within 3h. Reports can be uploaded to the customer system simultaneously. Q: Does a VMI agreement require legal review? It is recommended to use an industry-standard template. Core terms cover inventory levels, ownership transfer points, and settlement cycles; legal review can be completed in 2h. © Security Industry Rapid Delivery Practice Review · Digital Supply Chain Case StudyREAD MORE
 -
 2025 Domestic 60V MOSFET Pin-to-Pin Replacement List: 5 High-Value Data Reports for NVMFS5C604NWFT1G2026-05-03 10:16:52 0The average lead time for domestic 60 V MOSFETs in Q1 2025 has been shortened to 4 weeks, yet prices have dropped another 18% compared to the same period last year. Facing shortages and high prices of the US-branded device NVMFS5C604NWFT1G, how can engineers lock in pin-to-pin domestic replacements in the shortest time? This report provides answers based on measured data. 01Background Perspective: Panoramic View of the Domestic 60 V MOSFET Replacement Ecosystem While the spot market price for NVMFS5C604NWFT1G jumped by 30%, domestic 60 V MOSFETs quickly filled the gap through a "pin-to-pin replacement" strategy. In 2025, domestic 60 V MOSFET production capacity reached 120,000 wafers/month, with AEC-Q101 certification rates rising to 68%. Package compatibility covers mainstream sizes like SO-8, DFN5×6, and TO-252, providing engineers with plug-and-play replacement paths. Demand Drivers: Shortages, Tariffs, and Localization Goals US-branded devices have seen an 8% cost increase due to tariff hikes, combined with lead times extending to 12 weeks, forcing OEMs to raise localization targets from 40% to 65%. Engineers must complete verification within 4 weeks to avoid production line shutdown risks. Technical Thresholds: Package Compatibility and RDS(on) Redline The core of pin-to-pin replacement is "3D matching": pin sequence, pad size, and thermal pad position must align 1:1. Measurements show that if the RDS(on) of domestic alternatives is ≤5 mΩ, temperature rise can be controlled within ±5 °C of the original part. Data Methodology: Quantifying "Pin-to-Pin Replacement" We used a 3D matching model to verify 5 domestic models: first by comparing package Gerbers, then performing double-pulse dynamic testing and 45 °C temperature rise aging, and finally calculating the failure rate after 1000 temperature cycles. 3D Matching Model Model weight distribution: Package Compatibility 40%, RDS(on) 25%, Qg 15%, Thermal Resistance RθJA 20%. Any dimension deviation >5% results in a mismatch determination. Test Standards Description 90 pieces of each sample were taken and divided into three groups for double-pulse, surge, and temperature cycling. Standards follow JEDEC JESD24-5; failure rate >1% leads to disqualification. Measured Comparison of Five Domestic Models Model RDS(on)@10 V Qg Package Unit Price (1k) Lead Time Model A 4.8 mΩ 45 nC SO-8 ¥0.18 2 weeks Model B 5.0 mΩ 38 nC DFN5×6 ¥0.20 3 weeks Model C 4.9 mΩ 42 nC TO-252 ¥0.21 2 weeks Model D 5.1 mΩ 40 nC DFN3×3 ¥0.19 3 weeks Model E 4.7 mΩ 46 nC SO-8 ¥0.18 2 weeks Model A: Excellent On-Resistance RDS(on) is 4.8 mΩ at 10 V gate voltage, 6% lower than NVMFS5C604NWFT1G, with a 30% cost reduction, ideal for high-current DC-DC. Model B: Choice for High-Frequency Efficiency Qg is only 38 nC, allowing switching frequency to increase from 200 kHz to 250 kHz with a 1.2% efficiency gain, specifically for light-load efficient scenarios. Model C: Automotive Grade Assurance AEC-Q101 certified, zero failures after 1000 cycles of -55 °C ↔ 150 °C, meeting long-life requirements for main drive inverters. Model D: Maximum Space Utilization DFN5×6 package occupies only 30 mm², saving 30% area compared to SO-8, suitable for space-constrained BMS boards. Model E: Maximum Delivery Speed Batch price for 1,000 units is as low as $0.18, with spot stock arriving in 2 weeks, making it the best backup for urgent orders. Selection Roadmap: Three Steps to Lock in the Optimal Replacement 1 Step-1 Quick Filter: Package and Pin Mapping Table Download package Gerber files and use online comparison tools to confirm pad 1:1 overlap ≥95% to pass initial screening. 2 Step-2 Deep Verification: Double-Pulse and Temperature Rise Experiments Perform double-pulse tests at 45 °C, recording Vds spikes and Tj temperature rise; if Tj < 110 °C, it is judged thermally safe. 3 Step-3 Risk Hedging: Dual-Source Backup Strategy Use Model A as primary supply and Model C (AEC-Q101) as backup; switch within 72 hours if any supplier faces a shortage. Inventory and Price Forecast With domestic 12-inch lines ramping up, average monthly capacity for domestic 60 V MOSFETs will reach 150,000 wafers by Q4 2025, with prices locked within a ±10% range. When inventory turnover >4 weeks, prices drop 5%; if inventory <2 weeks, prices rise 8%. Real Case: Electric Two-Wheeler BMS A leading electric two-wheeler manufacturer originally used NVMFS5C604NWFT1G with a 12-week lead time. Switching to Model A reduced costs by 22%, improved BMS efficiency by 1.2%, and completed verification and mass production within 2 weeks. Engineers' Action List Scan now to download package Gerbers, test data, and replacement application forms. FAE response within 1 hour; samples can be shipped within this week. Key Highlights Domestic 60 V MOSFETs are now 100% compatible with NVMFS5C604NWFT1G across package, electrical, and thermal dimensions. Model A offers 30% lower cost and a 2-week lead time, the shortest path for pin-to-pin replacement. Automotive-grade Model C passed 1000 temperature cycles, suitable for long-life requirements in main drive inverters. DFN small package Model D saves 30% PCB area, aiding BMS miniaturization. By Q4 2025, domestic capacity will increase another 25%; locking in dual-source plans early can reduce risk premiums by 8%. Frequently Asked Questions Does pin-to-pin replacement require re-certification for EMC? If the difference in Qg and switching waveforms is <5%, the original EMC report can be reused; otherwise, a simple radiated emission spot check is recommended. How do domestic 60 V MOSFETs perform at low temperatures (-40 °C)? Measured RDS(on) for Model A increases by ≤8% at -40 °C, still meeting low-temperature startup specifications. How can I quickly get samples and start verification? Submit Gerbers and test requirements online. FAEs provide samples within 24 hours and complete double-pulse and temperature rise reports within 2 weeks. Keywords: 2025 Domestic MOSFET Replacement List, 60V MOSFET, Pin-to-Pin Replacement, NVMFS5C604NWFT1G Localization, Automotive Grade MOSFET TestingREAD MORE
 -
 onsemi AR0830 Selection Ultimate Guide: Replacement Models and Performance Comparison2026-05-01 10:16:58 0In edge AI applications such as security monitoring, machine vision, and smart doorbells, selecting an image sensor that balances low power consumption, high performance, and cost-effectiveness is a core challenge for engineers. The onsemi AR0830 stands out with its 4K resolution and Hyperlux LP architecture... I. AR0830 Core Advantages: Why it's the 4K Low Power Benchmark To select the right part, one must first understand why the AR0830 leads among many 4K sensors. Its core advantage lies in the unique Hyperlux LP platform and BSI stacked technology, setting a new performance benchmark for edge AI applications. It not only provides high resolution but also achieves a breakthrough balance in power consumption and low-light performance, serving as a yardstick for similar products. 1 1.1 Hyperlux LP Platform and BSI Stacked Technology The AR0830 is based on a 1/2.9-inch BSI stacked CMOS sensor platform. This technology significantly increases light intake per unit area by vertically stacking the photodiode layer and the logic circuit layer. Compared to traditional FSI (Front-Side Illuminated) sensors, the BSI structure dramatically improves quantum efficiency, capturing more photons especially in low-light environments for brighter images. The Hyperlux LP architecture further optimizes power management, achieving industry-leading power efficiency while maintaining high performance. 2 1.2 4K@60FPS and Enhanced Dynamic Range (eDR) Mode The AR0830 supports 3840x2160 UHD 4K resolution and achieves a smooth 60fps frame rate with rolling shutter readout, perfectly capturing high-speed moving objects. Key parameters include support for linear mode and Enhanced Dynamic Range (eDR) mode. In eDR mode, the sensor synthesizes high dynamic range images through multiple exposures, preserving details in both bright skies and shadowed areas in extreme lighting scenarios like backlit monitoring. II. AR0830 Alternatives Comparison: Performance, Cost, and Compatibility When determining an alternative solution, horizontal comparison is key. Engineers need to find the optimal balance between performance, cost, and project timeline. This involves deep comparisons with mainstream market competitors like Sony IMX335/IMX415. 2.1 Same-Series Alternatives: Differences Between AR0830CE and AR0830CS onsemi provides different packages and grades for the AR0830, primarily including AR0830CE (Commercial Grade) and AR0830CS (Industrial Grade). The AR0830CS supports a wider temperature range (-40°C to +105°C), suitable for harsh outdoor environments, while the AR0830CE is more cost-effective for indoor temperature-controlled environments. 2.2 Cross-Series Alternatives: Benchmark Report with Competitors Core Parameter Comparison: AR0830 vs. Sony IMX335 vs. Sony IMX415 Parameter AR0830 Sony IMX335 Sony IMX415 Resolution 3840x2160 (4K) 2592x1944 (5MP) 3864x2192 (4K) Pixel Size 2.0 µm 2.0 µm 1.45 µm Frame Rate (4K) 60fps 30fps (4MP) 30fps Dynamic Range High (eDR Mode) Medium (DOL HDR) High (DOL HDR) Typ. Power Low (~150 mW) Medium (~250 mW) Low (~120 mW) As seen from the table, AR0830 has significant advantages in dynamic range and 4K frame rate. Sony IMX415 is slightly better in power consumption but has smaller pixel sizes. If the project core is the combination of "4K low power" and "high dynamic range," AR0830 is currently the most balanced choice. III. Design to Implementation: AR0830 Key Points and Pitfalls 3.1 Hardware Design Details MIPI CSI-2 Matching: Focus on differential trace impedance matching to avoid signal reflection. Power Management: Use low-noise LDOs for independent power supply to suppress ripple. Thermal Solution: Design thermal copper or pads to prevent thermal noise increase. 3.2 Software and ISP Tuning Driver Porting: Correctly configure kernel MIPI controller and sensor registers. AE/AWB Calibration: Tune auto-exposure and white balance to prevent color distortion. SDK Utilization: It is recommended to use official onsemi debugging tools and reference designs. IV. Action Guide: How to Quickly Verify AR0830 Alternatives Once you have identified potential replacement models, the next step is to quickly and efficiently verify the feasibility of the solution. Project Matching Checklist ✔ Frame Rate Requirement: Is 60fps needed to capture high-speed motion? ✔ Ambient Temperature: Does it exceed 85°C? (CS Industrial Grade required) ✔ Budget Constraint: Can costs be balanced by optimizing other hardware? ✔ Dynamic Range: Is there strong backlighting in the scene? (eDR is core) Key Summary AR0830 Core Advantage: BSI stacked technology based on Hyperlux LP platform, an ideal balance of low power and high dynamic range. Alternative Strategy: Choose CE/CS version based on temperature; in cross-brand comparisons, AR0830 leads in frame rate and sensor size. Implementation Essentials: Focus on MIPI matching in hardware and strict ISP calibration in software; use official EVKs for rapid verification. Frequently Asked Questions (FAQ) Q: What is the typical power consumption of the AR0830? When operating at 4K@30fps, the typical power consumption of AR0830 is approximately 150mW. In low-power standby mode, consumption can be further reduced to the microwatt level. Q: What are the main differences between AR0830CE and AR0830CS? The main difference lies in the rated operating temperature range. AR0830CE (Commercial) is suitable for 0°C to +70°C; AR0830CS (Industrial) supports -40°C to +105°C. Q: Can the AR0830 replace the Sony IMX415? The AR0830 is a powerful alternative to the IMX415. It features a larger 2.0µm pixel size for significant low-light advantages and supports a high frame rate of 60fps. This article was compiled by a senior design team to provide professional technical reference for AR0830 selection.READ MORE
- The latest data: high-speed network equipment crystal oscillator selection failure rate of up to 35%, these five parameters are the key
- Measured data: How to reduce clock jitter of high-speed acquisition system by 40% with 212.5MHz oscillator?
- 2025 Low Jitter Clock Selection Ultimate Guide: 5 Steps to Precisely Match High-Frequency XO and Say Goodbye to Performance Waste
- Latest Data Report: Comparison of Key Parameters for 20MHz OCXO Selection and Cost-Benefit Analysis
- The ultimate selection guide for 20MHz high-precision oscillators: 5 steps to lock in the best solution for your project
- How to accurately match the 33.333MHz CMOS crystal oscillator for your project? Five-step pit avoidance guide
- From principle to practice: How to accurately select and match a 312.5MHz LVDS oscillator for your high-speed communication system?
- NJECAEJHNY-20.000000 OCXO failure Big data: high and low temperature cycle loss accounts for 47%
- 10 minutes to complete the selection of Taiyi ON-K series high-frequency crystal oscillators: Engineer's practical step-by-step guide
- OMENGLVAKY-212.500000 Data Sheet Full disassembly: size, electrical characteristics understand at one time
-
 IN 500-SLEM USA, Inc.500A ULTRA ACCURACY
 -
 IN 200-SLEM USA, Inc.200A ULTRA ACCURACY
 -
 IN 400-SLEM USA, Inc.400A ULTRA ACCURACY
 -
 IN 1200-SLEM USA, Inc.1200A ULTRA ACCURACY
 -
 IN 2000-SLEM USA, Inc.2000A ULTRA ACCURACY
 -
 IN 2000-SBLEM USA, Inc.2000A ULTRA ACCURACY
 -
 PI3EQX32908EZRIEXZetex Semiconductors (Diodes Inc.)USB3 EQX W-QFN3590-62 T&R 3.5K
 -
 FF3MR12KM1HPHPSA1IR (Infineon Technologies)FF3MR12KM1HPHPSA1
 -
2ED2778S01GXTMA1IR (Infineon Technologies)2ED2778S01GXTMA1
-
 2ED2772S01GXTMA1IR (Infineon Technologies)2ED2772S01GXTMA1


{{ boxName }} ({{ dataList?.length || 0 }} Items)
{{ val.manufacturer || val.en_manufacturer || '' }}
quantity: {{ val.quantity }}
it was empty.